
Das beste aus dem CCESP rausholen (in Arbeit), based on doom9.org, thx !
Wenn es fertig ist geht es an doom9.org, also keine Beschwerden bitte !!!
CCE, one of the most popular MPEG-2 encoders these days (and it does MPEG-1, too) has one feature that has been getting absolutely zero attention until on Christmas Eve there was an article published on robshot.com that explained how to use that feature. Until that point most people were not even aware that this feature existed and I didn't feel to need to investigate it either. Part of this might also be due to most CCE cracks (not everybody is willing to pay the high price of CCE ) accidentally disabling that feature. In any case, CCE has an advanced mode where you can tweak the bitrate distribution manually down to the GOP level. This guide will teach you how to use this feature and how to get better looking files by reducing the number of passes and a rather quick manual intervention between the first and the second pass.
This document is based on the article published on robshot.com and permission was obtained to use this information on this site.
You will need the following software for this guide:
CCE 2.50
BitrateViewer
DVD2AVI
ChapterXtractor
VFAPI
or Avisynth
& mpeg2dec
Please note that this guide is sort of hanging in the air. It will leave you with a DVD compliant MPEG-2 video file and an AC3 file but you can import these in any DVD authoring program and create a DVD-R that can be played in any DVD-R capable device.
Step 1: Create a DVD2AVI project
In this step we're going to create a DVD2AVI project file. This project file can be later converted to a pseudo-AVI file for frameserving purposes. Please do not forget to write down the values mentioned in the guide.
Step 2: Frameserve
Using the VFAPI Converter we're going to transform our DVD2AVI project into something CCE can open.
If you have CCE 2.50 you can use Avisynth instead which is a bit more complicated, but also much faster. Start up notepad and paste the following lines into it. Then replace the path of mpeg2dec.dll with the actual path of the file on your system and do the same for the mpeg2source command. The last line is used to trick CCE into believing that the input file has an audio track. Otherwise CCE would crash when being run on an AMD processor.
LoadPlugin("C:\PROGRA~1\GORDIA~1\mpeg2dec.dll")
mpeg2source("D:\rmd\rmd.d2v")
ResampleAudio(44100)
Then save the file as movie.avs and make sure you set the filetype to All (*.*) before saving or you'll get a file called movie.avs.txt which Windows may show as movie.avs because it's not showing the extensions.
Step 3: CCE
Start up CCE, right click in the main white area and select add, then load your VFAPI AVI or .avs script. In case of AVS you have to set the filetype to All (*.*) or the .avs file won't show up.
Then right click on the line that now shows up and select edit:
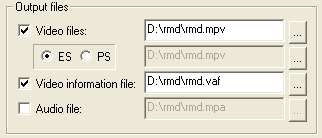 Make
sure you get a Video information file and that the Video file is set to ES
(Elementary stream). Also uncheck audio file. We don't need an mp2 file as we're
going to use the AC3, plus audio encoding is very buggy and likely to crash
anyway.
Make
sure you get a Video information file and that the Video file is set to ES
(Elementary stream). Also uncheck audio file. We don't need an mp2 file as we're
going to use the AC3, plus audio encoding is very buggy and likely to crash
anyway.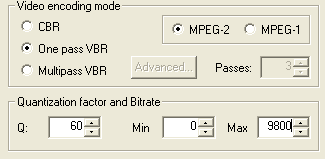 For the
first time you have to set Video encoding mode to One pass VBR. Make sure you've
set CCE to create an MPEG-2 file. Set the Quantization factor to 60, the minimum
bitrate to 0 and the maximum bitrate to 9800.
For the
first time you have to set Video encoding mode to One pass VBR. Make sure you've
set CCE to create an MPEG-2 file. Set the Quantization factor to 60, the minimum
bitrate to 0 and the maximum bitrate to 9800.
Note: Depending on the number of audio tracks, subtitle tracks but also on
the movie that bitrate may be too high and you'll get a "Total Bitrate is too
high" error in your authoring program. I've tried it a couple of times using 2
384kbit/s AC3 tracks and 2 subtitle tracks and was always successful but the
more tracks you have the higher the chance you'll run into this problem. In such
a case you must lower the Max bitrate, try 9500 or even go down to 9000 (and use
the same value for the 2nd pass as well!).
Then press the Video
button in the Other settings section at the bottom:
 Set
luminance level to 16 to 235, Intra DC precision to auto, Aspect ratio to DAR
16:9 (unless you actually have a 4:3 movie in which case you'd set that
parameter to DAR 4:3).
Set
luminance level to 16 to 235, Intra DC precision to auto, Aspect ratio to DAR
16:9 (unless you actually have a 4:3 movie in which case you'd set that
parameter to DAR 4:3).
Make sure you change the timecode to 00:00:00:00 or you'll have problems importing the video into the authoring program. Also check DVD compliant, Add sequence end code and Linear quantizer scale.
The other parameters depend on the source. Use Bitrateviewer on the first VOB
file to find out these parameters. Here's an example: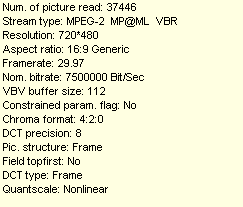 The
4 parameters at the bottom are important. As you can see the Picture structure
is frame which means the content is frame based rather than Field based, so you
would check Progressive frames in CCE. The DCT type: Frame also points to this.
If the content were interlaced the DCT type would by Field instead.
The
4 parameters at the bottom are important. As you can see the Picture structure
is frame which means the content is frame based rather than Field based, so you
would check Progressive frames in CCE. The DCT type: Frame also points to this.
If the content were interlaced the DCT type would by Field instead.
Field topfirst is no, so we don't check Upper field first in CCE.
Quantscale is actually nonlinear which would lead us to believe to not check
Linear quantizer scale but the original author of this method told me that
linear quantizer scale yields better quality.
Next we change
the GOP settings:
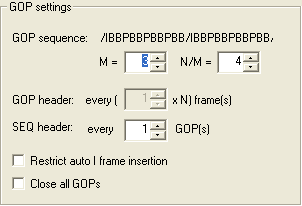 Set the
N/M parameter for the GOP sequence to 4 and leave M to the default of 3 or your
authoring program will complain. Also make sure that SEQ header is set to every
1 GOP and leave the other two options unchecked.
Set the
N/M parameter for the GOP sequence to 4 and leave M to the default of 3 or your
authoring program will complain. Also make sure that SEQ header is set to every
1 GOP and leave the other two options unchecked.
Let's also
have a look at the quality settings:
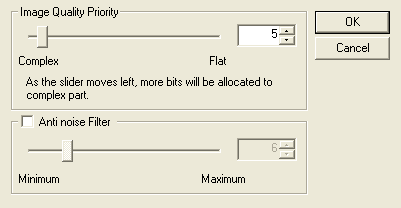 Set the Image
Quality Priority slider to position 5 and deactivate the Anti noise filter. DVD
sources are usually of high enough quality so that filter is not necessary, and
we have enough bits to encode even complicated content. If your source is of
really low quality (very old DVDs, or non DVD MPEG-2 content) you may want to
use this parameter.
Set the Image
Quality Priority slider to position 5 and deactivate the Anti noise filter. DVD
sources are usually of high enough quality so that filter is not necessary, and
we have enough bits to encode even complicated content. If your source is of
really low quality (very old DVDs, or non DVD MPEG-2 content) you may want to
use this parameter.
Press OK to get back to the settings screen
and OK again to get back to the main screen. Then save the current project (File
- Save) as movie.ecl and close the program. Then start up ChapterXtractor and
load the main movie IFO, then go to the Format tab and define a new format as
shown below.

To do this, select an empty preset from the Presets dropdown list, then press the button right next to it to give the new preset a name, then make sure the Header line is empty and finally fill in the format: chapter=%f: and press the button on the right side of the format field to save the new preset. In case you have an NTSC title don't forget to change the FPS rate in ChapterXtractor to 23976. Now copy (mark with the mouse then press Control-C) the content of the main part of the window where it will show something like:
chapter=0:
chapter=5626:
chapter=11592:
chapter=17771:
chapter=22502:
Copy all these lines, then open your CCE project file (movie.ecl) in Notepad, go to the end of the file which will look like this:
[file]
name=D:\SWORDFISH\VIDEO_TS\swordfish.avs
type=0
frame_first=0
frame_last=142829
encode_first=0
encode_last=142829
and add the lines from ChapterXtractor to the end of the file:
[file]
name=D:\SWORDFISH\VIDEO_TS\swordfish.avs
type=0
frame_first=0
frame_last=142829
encode_first=0
encode_last=142829
chapter=0:
chapter=5860:
chapter=11877:
chapter=16979:
chapter=21775:
Then save the ecl file, start up CCE again and load your project file. Then press the encode button. All you have to do now is wait until CCE has done its thing. Luckily, if you have reasonable modern hardware you can expect faster than real-time encoding, especially when using Avisynth. I get like 1.45 real-time on an Athlon XP 1800 so the wait is not as insupportable as when using TMPG.
Once CCE is done you will have 2 files: a VAF file that contains some info about the video stream and an mpv file. Normally it will not have the desired size plus you want to tweak it even further but just in case have a look at it and if it fits your needs you're done already.
Step 4: 2nd pass
While CCE is still open right click and select edit yet again.
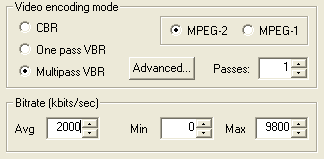
Change the Video Encoding mode to Multipass VBR and set the number of passes to 1. Also set the average bitrate to 2000, the min bitrate to 0 and the max bitrate to 9800. Then press the Advanced button.
 Now CCE will
behave like TMPG. It will start hogging the CPU and not respond any longer.
Depending on your machine's speed it may take several minutes until CCE "comes
back" again.
Now CCE will
behave like TMPG. It will start hogging the CPU and not respond any longer.
Depending on your machine's speed it may take several minutes until CCE "comes
back" again.
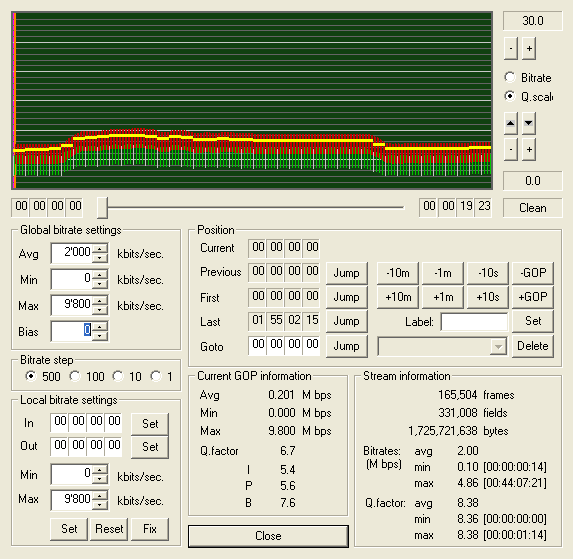
The first thing you must do is check Q.scale (on the top right of the screen) and you'll get to see something like in the screenshot. The graph has the following meaning: The red white line represents the average quantization scale of the I pictures, the green line the avg quantscale of the P pictures and the red line the avg quantscale of the B pictures. The yellow line finally represents the avg quantscale of the respective GOP units.
The lower these lines the lower the distortion of the image. The background has also been colored in a way to show you the relative quality. If the background is green it means good quality, gray parts mean standard image quality and red background means serious image distortion. Your goal here is to have as many green parts as possible.
Before we go into the details a few general things. You can use the slider to move around in the video stream. On the left and right of the slider you see the timecodes of the start and endpoint of the graph as currently being shown. Using the plus, minus, up and down buttons on the left of the graph you can change the scale of the graph.
Using the position buttons allows you to advance by a certain amount of time. +-10m means plus minus 10 minutes, +-1m means plus minus one minute, +-10s means plus minus 10 seconds and +-GOP means plus minus one GOP. You can also give a certain timepoint a label by entering a name in the label field and then press the Set button. The dropdown list below the label will then become active. Last but not least you can use the Goto fields to enter a certain timepoint, then press the Jump button to jump to that point in time.
The double vertical orange lines indicate the actual point in the movie for
which you can see some details in the Current GOP information part of the
screen. This line is not being shown until you advance in the video stream.
The stream information is also important. You can see the number
of bytes, that's the predicted size. The Q factor is also very important. You
will want to have a Q factor of 9 or below (represents having 95% green parts).
The lower this number the better the overall quality. Now there's two ways to
decrease that parameter. One is using the Global bitrate settings which will
increase the bitrate globally. Clearly, this means that the global size will
also increase by much.
The alternative is local bitrate settings. If you see a certain part of the video where the quality is much lower than the rest you can use the local bitrate settings parameters to increase quality on just that part of the video.
Before we start doing something 3 more things: First set the bias in the global bitrate settings to 0. Second you can change the bitrate step parameters. The default is to increase the bitrate by 0.5mbit, which works reasonably well for the local bitrate settings but once you've done the optimization on a small scale you may still want to increase the global bitrate but use smaller bitrate steps there. There's a field on the lower right of the bitrate graph that shows the state of the calculations. If it shows clean everything has been done, if it shows planning then CCE is calculating. You can still perform operations when CCE is calculating provided you use a stable OS (NT, W2K, XP) but just in case I wouldn't change the bitrate in 10 positions during the calculations.
Now let's get started. Unfortunately this will take a few minutes of your time. Move through the movie in a linear fashion (no going back) using the +10s button to advance by 10 seconds. Keep watching the graph. If you got a gray background like this you will want to change it:

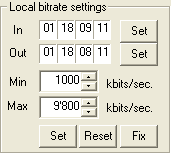 Use
the -GOP button to locate the beginning of the gray area, then press the Set
button on the right of the In field. Then advance to the end of the gray area
and use the Set button to mark the Out position. Then start increasing the min
bitrate. Then press Set and let CCE calculate the new curve. Do this until the
gray area has turned green (you'll see that the colored lines will begin to
descend as you increase the bitrate). In some cases it's not possible to get rid
of the gray part as the max bitrate is being used already (you can see that by
switching to the bitrate view). In that case there's nothing you can do and you
can move on to the next position.
Use
the -GOP button to locate the beginning of the gray area, then press the Set
button on the right of the In field. Then advance to the end of the gray area
and use the Set button to mark the Out position. Then start increasing the min
bitrate. Then press Set and let CCE calculate the new curve. Do this until the
gray area has turned green (you'll see that the colored lines will begin to
descend as you increase the bitrate). In some cases it's not possible to get rid
of the gray part as the max bitrate is being used already (you can see that by
switching to the bitrate view). In that case there's nothing you can do and you
can move on to the next position.
If you press Set the settings you have made will be kept until you do a
global bitrate change. When you're fixing gray parts you may want to use the Fix
button to make the changes permanent so that even when you increase the global
bitrate the bitrate in the part that you set manually will still be kept.
Once you've gone through the whole movie and eliminated the gray
parts as good as possible have another look at the global size part. As a rule
of thumb you add up the size of the video and your audio streams and multiply
the whole by 1.05 and you get a rough estimate of the size of the mastered DVD
(of course there's the extras that will also take up space) so if you still have
some space left you can now increase the global bitrate to use up more space, or
you may be able to squeeze even a 2nd movie onto the same DVD-R. In any case, if
you only have green parts it should be very hard to tell the difference between
the original DVD and your copy.
Once you've set everything press the Close button. You can further increase the image quality by increasing the number of passes to get a finer bitrate distribution in hard to encode parts (about 5% for complex frames). Then press OK again and start encoding.
You'll end up with a .mpv file which you can rename to .m2v so that all authoring programs will know what to do with the file.
Step 5: Pulldown (NTSC only)
If you have an NTSC movie you've most likely encoded it at 23.976 and will find that no authoring program will accept your video stream. This is because the stream has the wrong framerate. Use pulldown.exe on the file as follows:
pulldown input.m2v output.m2v
Pulldown is a command line utility so you can't just double click on it, but you have to go to a command prompt to launch it. Once you've performed this operation you're done and the video file should now be accepted in every authoring program.
>> BACK
This document was last updated on 08/05/02